As of last week I have a new study project: the brand-new Juniper certification track for JNCIS-DevOps; finally a vendor-cert that lets me sink my teeth in anything other than a CLI. This means building a couple of new labs, so it seemed like a good time to dive into Wistar again.
About Wistar
What is Wistar? The Wistar documentation has a nice definition:
"Wistar is a tool to help create and share network topologies of multiple virtual machines. It uses a drag and drop interface to make connecting instances together into large networks super easy. These topologies can then be saved, shared, cloned, or destroyed at will. The idea is to make experimenting with virtual networks and virtual machines as frictionless as possible."
In other words, it's a network lab tool, much like GNS3 and EVE-NG, but geared towards Juniper equipment. This means that it has excellent support for Juniper routers, switches and firewalls, but it's a bit harder to run other types of (virtual) devices.
For me, the main advantages of Wistar are:
- Wistar abstracts the complexity of running separate VMs for routing engine (RE) and forwarding engine (PFE) roles, that are required for vMX and vQFX devices.
- Wistar handles initial configuration such as hostnames, users, etc.
- Wistar has built-in functionality to execute operational commands and apply configuration snippets across all devices

Installing Wistar
Sounds good, right? Unfortunately, Wistar does not provide a nice prepackaged OVA to get started, and instructions to build a Wistar-server yourself are quite extensive. Luckily for us, Ansible is there to help us out: Wistar includes a sample playbook that includes all the required steps. This boils the installation procedure down to the following steps:
-
Install a fresh new Ubuntu 16.04 server, for example using this ISO image.
-
Install ansible using pip:
sudo pip install ansible -
Grab a copy of the ansible playbook and the apache configuration file from the Wistar repository.
-
Run the ansible playbook
sudo ansible-playbook install_wistar_ubuntu_16_pb.yml -
If necessary, reboot the server.
You're ready to run, the Wistar interface is available on port 8080
Get the right images
Having Wistar running is nice, but like GNS3 and EVE-NG you'll still need to add actual images for your virtual equipment. Juniper equipment is available for download, as long as you have a Juniper.net SSO account (create one here).
For a complete set of devices, you need images for a switch, a router, a firewall and a server. Wistar is a bit peculiar about which versions perform well (or boot at all), so here is my list of working images.
vQFX
For a switch use the vQFX which is available as evaluation from the Juniper site. Use 15.1X53-D60 for the routing instance (RE), and 20160609-2 as the PFE.
vMX
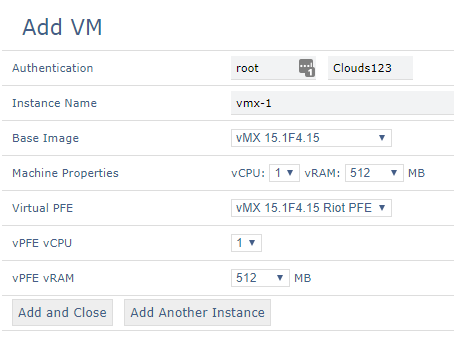
For a router, use the X86 version of vMX-15.1F4.15. This is the last version that includes the "simulated" PFE (known as "riot" in Wistar). This makes it by far the most lightweight version of vMX around. Just extract jinstall64-vmx-15.1F4.15-domestic.img from the .tgz file and upload as Junos vMX RE, and Wistar will automatically add a Riot PFE based on the same image. When you select the correct images while adding a VM, it will default to use 1 vCPU and 512MB for both the RE and PFE:
vSRX
As firewall I'm using vSRX 17.3R1.10, but it takes a really long time to boot. Many people have had the best results with vSRX 15.1X49-D60, but that is optimized for Linux kernel 4.4, and since I'll be messing with the kernel later on in this post, I'll stick with 17.3.
Ubuntu
And finally I'm using Ubuntu server as lightweight client. Be sure to grab the cloud-img version.
Enhancing Wistar for LACP and LLDP
By default, the bridges Wistar uses to connect devices are unable to pass LACP, STP and LLDP frames. That's not a very big deal, I can handle most of my labs without needing either; but it would be nice to be able to enable these features.
For LLDP this is actually easy. All you need to do is set the correct bit on the forwarding mask for each bridge after it's created:
echo 16384 > /sys/class/net/t1_br1/bridge/group_fwd_mask
It's a bit harder for to enable LACP and STP frames, since the Linux kernel restricts the group_fwd_mask you're allowed to set. These types of frames are definitely not meant to be forwarded by a bridge! You need to patch your kernel before compiling to circumvent this restriction.
That sounds like a lot of work, so I simply grab a pre-patched kernel from EVE-NG. This kernel is tuned for network labbing, and gives me some added enhancements like UKMS for free. We're installing this kernel by appending some tasks to the ansible playbook:
  - name: Get the EVE-NG repo key
    apt_key:
      url: http://www.eve-ng.net/repo/[email protected]
      state: present

  - name: Add EVE-NG repository
    apt_repository:
      repo: deb [arch=amd64]  http://www.eve-ng.net/repo xenial main
      state: present

  - name: Install the EVE-NG kernel
    apt:
      name: linux-image-4.9.40-eve-ng-ukms-2+
      state: present
      update_cache: yes
Rebooting will start with the new kernel, so now we can add a bitmask to our bridges that will pass all types of frames:
echo 65535 > /sys/class/net/t1_br1/bridge/group_fwd_mask
Where to go next
Does this whet your appetite? Here is what you need to do next:
- Read all about how to use Wistar on the documentation page.
- Check my wistar-tools repository on Github for the (augmented) ansible playbook I use install Wistar.
- The same repository also contains my python script to "fix" all bridges to allow forwarding of LLDP, LACP and STP frames.
Try for yourself, and have fun labbing!
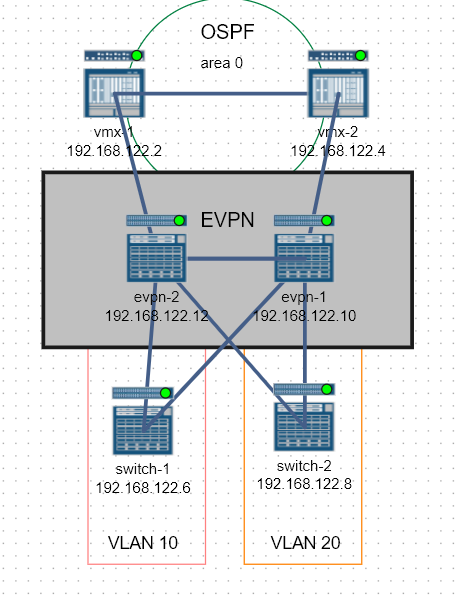
Playing around with Wistar
Wistar is a tool to easily create networking labs with Juniper equipment. In this post I explore Wistar, recommend some images to use, and tinker with the tool to make LLDP and LACP work by using the EVE-NG kernel.